Zwieback Toast (Teething Cookies)
A quintessential childhood food. This is a copycat recipe of the traditional Zwieback Toast. My daughter has an allergy to cow's milk, so I substitute the milk for half water and half coconut milk and it works out perfectly. Note: It takes two days to make these cookies. The first day, you make a raised loaf. The baked loaf sits to cool and set during the night. The next day, the loaf is cut into slices and put in the oven to dry. A lot more work than buying them off the store shelf, but your toddler will love you for it -- I promise. Time to make DOES NOT include kneading time and raising time - just the time it takes to mix the ingredients together and baking time.
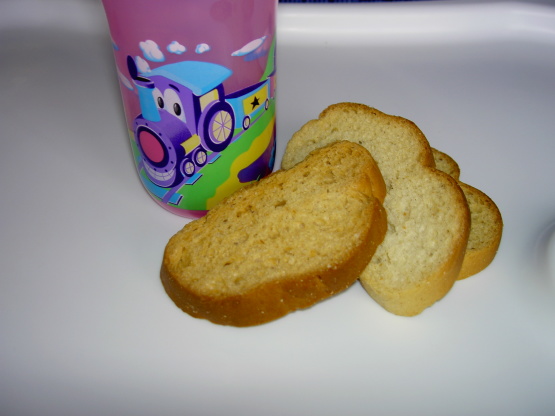
A quintessential childhood food. This is a copycat recipe of the traditional Zwieback Toast. My daughter has an allergy to cow's milk, so I substitute the milk for half water and half coconut milk and it works out perfectly. Note: It takes two days to make these cookies. The first day, you make a raised loaf. The baked loaf sits to cool and set during the night. The next day, the loaf is cut into slices and put in the oven to dry. A lot more work than buying them off the store shelf, but your toddler will love you for it -- I promise. Time to make DOES NOT include kneading time and raising time - just the time it takes to mix the ingredients together and baking time.
- Carbohydrate 0.398032986085263 g
- Cholesterol 2.65677083656145 mg
- Fat 0.979401598443686 g
- Fiber 0.0622579858170615 g
- Protein 0.300596718744629 g
- Saturated Fat 0.614761415704122 g
- Serving Size 1 1 biscuit (7g)
- Sodium 9.35021181400628 mg
- Sugar 0.335775000268202 g
- Trans Fat 0.0718589462660658 g
- Calories 11 calories
Step-by-step
- Stir together 1/2 teaspoon of sugar, the yeast and 2 tablespoons lukewarm milk in a small bowl; let the mixture foam and bubble.
- Meanwhile, heat the remaining milk and sugar and the butter, just until the butter melts. Let the mixture cool to 100degrees to 105degreesF, or until barely warm.
- Combine the milk mixture and the yeast mixture in a large bowl.
- Stir in the cinnamon, nutmeg and salt, and beat in the egg.
- Mix in the unbleached flour, 1/2 cup at a time. When the dough begins to pull away from the sides of the bowl, turn it out onto a lightly floured work surface and knead in the remaining flour to form a smooth, elastic dough, just slightly on the slack side; this should take 5 to 10 minutes.
- Lightly grease a large bowl, place the dough inside, cover it with plastic wrap and let it rise until it's doubled in bulk, about 1 1/2 hours.
- Punch the dough down, knead it briefly on a lightly floured work surface to remove large air bubbles, and divide it in half.
- Roll the pieces with your hands to form two 12-inch long cylindrical loaves. If the dough resists rolling, let it rest, covered, for several minutes; when you return, you should find the gluten relaxed and the task much easier.
- Place the loaves on a well-greased or parchment-lined baking sheet, leaving about 2 inches between them.
- Cover the loaves with plastic wrap and let them rise until they've almost doubled in size, about 45 minutes.
- Bake the bread in a preheated 350degreesF oven until it's golden brown and an instant-read thermometer inserted in the center of the loaves reads 190degreesF.
- Cool overnight, uncovered, on a wire rack.
- The next day, preheat the oven to 200degreesF With a serrated knife, cut the loaves diagonally into slices about 1/2-inch thick.
- Place the slices, close together, on ungreased or parchment-lined baking sheets and bake them until they're completely dry, about 1 hour.
- Increase the oven temperature to 300degreesF and bake the slices until they're lightly browned, 15 to 20 minutes, turning them halfway through the baking time to check their progress and prevent over-browning.
- Cool on wire racks. When thoroughly cooled, these will keep for many weeks in an airtight container.
The Sweetest Memories Baked into Every Bite: Homemade Zwieback Toast
As a mother, there's nothing quite like the joy of creating cherished memories with my children. From tea parties to bedtime stories, these moments are the threads that weave the rich tapestry of our family life. And nestled within these precious memories, alongside singalongs and silly dances, is the simple pleasure of homemade Zwieback toast. It’s more than just a teething biscuit; it's a symbol of love, patience, and the enduring connection between parent and child.
This isn't your average store-bought zwieback. Oh no, this recipe holds a special place in our hearts, passed down through generations, a tradition I'm thrilled to continue with my own little ones. It’s a recipe steeped in nostalgia, a taste of childhood that I’m eager to share with my children. The process is a labor of love, taking two days from start to finish, but trust me, the end result is worth every minute. The tender, slightly sweet crumb, the satisfying crunch – it's perfection. And seeing the sheer delight on my toddler’s face as she enjoys her homemade zwieback? Priceless.
Making these cookies is a journey, a delicious adventure that involves a raised loaf, a cooling period, and then the transformation into these delightful crispy treats. I’ve adapted the recipe to accommodate my daughter's milk allergy, substituting half of the milk with coconut milk. It works flawlessly, preserving the original flavour while providing a gentler alternative. Every step, from kneading the dough to the final browning, is a chance to connect with my children, involving them in the process and sharing the magic of baking. We measure, mix, and even help with the more age-appropriate stages of baking. It’s a fantastic bonding experience, filled with giggles, floury hands, and the warm aroma of baking bread.
This isn't just about the final product; it’s about the experience. The gentle rise of the dough, the anticipation as it bakes, and the final satisfaction of seeing my children enjoy these special treats, knowing I made them with love. It's a wonderful feeling to know I’m giving my children something that is not only delicious but also filled with the love and care only a homemade treat can contain. They are not merely cookies, but little pieces of affection, baked with intention and seasoned with the warmth of family. The slightly sweet taste is enhanced by a nostalgic feeling, a flavor that reminds us of childhood.
Beyond the sweet taste, there is a remarkable sense of accomplishment. There is something about making something from scratch, something that requires patience, precision, and a little bit of know-how, that makes the result even more delicious and rewarding. The effort involved in making these zwiebacks also provides a wonderful opportunity to teach my children the importance of patience, perseverance, and the satisfaction of seeing a project through to completion.
This recipe, passed down through generations, is not just a recipe; it is a legacy, a tradition, a connection. It is a tangible link to the past and a sweet promise for the future. This recipe embodies the love, care, and dedication that a mother pours into every task she undertakes, demonstrating that a child's happiness and wellbeing are top priorities.
These zwiebacks, therefore, are much more than just a simple snack; they represent the dedication, love and patience that I put into everything I do for my children. It's about making memories, about sharing traditions, about creating a legacy of love, one cookie at a time. So, grab your aprons, little ones, and let's get baking!
Ingredients:
- 1/2 teaspoon salt
- 1/4 cup butter
- 1/4 teaspoon nutmeg
- 2 teaspoons active dry yeast
- 1/4 teaspoon cinnamon
- 1 egg lightly beaten
- 4 -4 1/2 cups unbleached all-purpose flour
- 1 cup lukewarm milk
- 1/4 cup plus 1/2 teaspoon sugar
- 2 tablespoons lukewarm milk



