How To Make Nut Butter
Homemade nut butter is so simple to make, just two ingredients nuts and salt Simply toast the nuts then put them in the food processor. Here I made nut butter three ways almond butter, walnut butter and pecan butter but any tree nut would work.
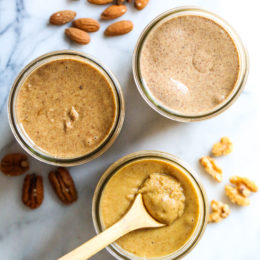
Homemade nut butter is so simple to make, just two ingredients nuts and salt Simply toast the nuts then put them in the food processor. Here I made nut butter three ways almond butter, walnut butter and pecan butter but any tree nut would work.
- Carbohydrate 0.0108016666666667 g
- Cholesterol 0 mg
- Fat 0.000543333333333333 g
- Fiber 0.00441666666666667 g
- Protein 0.001825 g
- Saturated Fat 0.000163333333333333 g
- Serving Size 1 1 recipe (454g)
- Sodium 0.00733333333333333 mg
- Sugar 0.006385 g
- Trans Fat 2.33333333333333E-05 g
- Calories 0 calories
Step-by-step
- Preheat the oven to 350 degrees Fahrenheit.
- Spread the almonds, walnuts or pecans on a large, rimmed baking sheet and toast the almonds 8 to 10 minutes, mixing halfway. (Don’t let them get dark).
- Let them cool before turning them into butter, about 10 minutes when they are warm, not hot.
- Transfer the nuts to a high-speed blender or food processor.
- Blend until creamy, scraping down the sides as necessary. You’re going to think it’ll never blend, but be patient! They will go from flour-like clumps, to a ball against the side of the food processor (keep scraping down the sides and breaking up the ball), and finally, it will turn lusciously creamy.
- If the mixture gets crazy hot along the way, stop and let it cool for a few minutes.
- Once the nut butter is very creamy, blend in the salt.
- If you wish to add additional flavors such as vanilla, cinnamon or honey, let the mixture cool, add the optional add ins and blend until creamy, a few more minutes.
- Let the nut butter cool to room temperature, then transfer the mixture to a glass jar (or old nut butter jar) and tighten the lid.
- Store in the refrigerator for up to 2 weeks, or until you see or smell any signs of spoilage.
Homemade Nut Butter: A Busy Mom's Guide to Simple Deliciousness
As a working mom, time is my most precious commodity. Juggling work, carpools, and keeping a semblance of order in the house leaves little room for elaborate cooking projects. That's why I've fallen in love with recipes that are both quick and satisfying. This homemade nut butter recipe fits the bill perfectly. Forget those expensive store-bought jars packed with additives – making your own nut butter is surprisingly simple, and the results are infinitely more rewarding.
The beauty of this recipe lies in its versatility. I often make a big batch on the weekend, using a mix of almonds, walnuts, and pecans depending on what's on sale or what I have on hand. It's a fantastic way to use up nuts that are starting to get a bit stale. The process itself is incredibly straightforward, requiring just a food processor and a few minutes of your time. You don't need any special culinary skills, just a bit of patience as the nuts transform from coarse crumbs into a smooth, creamy butter.
Why Homemade is Best: The biggest advantage of making your own nut butter is undoubtedly the control you have over the ingredients. You know exactly what's going into your jar, eliminating any unwanted additives, preservatives, or excessive sugars. Plus, the flavor is unparalleled. Homemade nut butter boasts a richer, more intense nutty flavor compared to many store-bought brands. It’s truly a testament to the power of simple, high-quality ingredients. It's a healthier, tastier, and more economical option in the long run, making it a smart choice for both my family and my wallet.
Beyond the Basics: Flavor Adventures: While the basic recipe is delicious on its own – simply toasted nuts and a pinch of salt – I love experimenting with flavors. A touch of cinnamon adds a warm spice, a drizzle of honey provides a touch of sweetness, and a splash of vanilla extract introduces a delightful creaminess. I’ve even tried adding a pinch of cocoa powder for a chocolate nut butter that’s irresistible on toast or in smoothies. The possibilities are truly endless!
Storage and Shelf Life: Once your nut butter is made, store it in an airtight container in the refrigerator. This will keep it fresh for up to two weeks. I often use old nut butter jars for this, reducing waste and adding a touch of nostalgic charm to my pantry. If you make a large batch, consider freezing portions for longer storage.
Uses Beyond Spreading: While spreading this homemade nut butter on toast is a classic treat, I’ve discovered countless other ways to incorporate it into my daily meals. It's a fantastic addition to smoothies, adding creaminess and a boost of healthy fats and protein. I also use it as a base for sauces, adding it to stir-fries or incorporating it into homemade dressings. It’s a versatile ingredient that adds a luxurious touch and a wonderful nutty flavor to a wide array of dishes. This simple recipe has become a staple in my kitchen, offering a delicious and convenient way to enjoy the goodness of nuts without the fuss of complex recipes.
This simple homemade nut butter is more than just a spread; it's a testament to the ease and satisfaction of creating something delicious from scratch. It's a small act of self-care that adds a touch of homemade goodness to my busy life, and I encourage you to give it a try.



