Apple Challah
Inspired by numerous apple challah recipes, this recipe aims for maximum apple flavor using a sweet challah dough and generously incorporating large apple chunks to minimize excess juice. Cinnamon is avoided to highlight the apple taste, and a sugared crust adds a delightful finish. A refined method simplifies the apple incorporation process, eliminating tedious hand-kneading. Braeburn apples are recommended but other baking apples can be substituted. This bread is perfect for breakfast, coffee, Rosh Hashanah celebrations, or gifting.
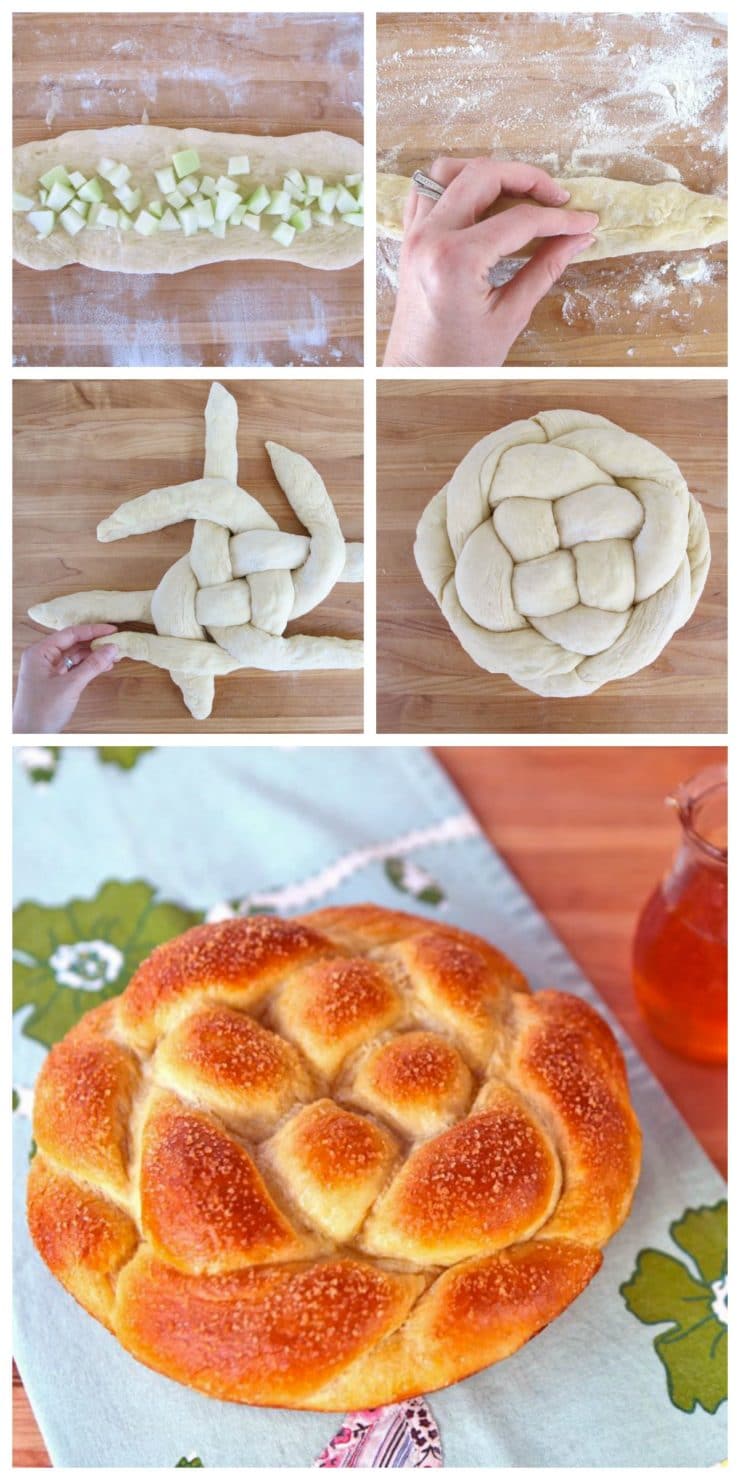
Inspired by numerous apple challah recipes, this recipe aims for maximum apple flavor using a sweet challah dough and generously incorporating large apple chunks to minimize excess juice. Cinnamon is avoided to highlight the apple taste, and a sugared crust adds a delightful finish. A refined method simplifies the apple incorporation process, eliminating tedious hand-kneading. Braeburn apples are recommended but other baking apples can be substituted. This bread is perfect for breakfast, coffee, Rosh Hashanah celebrations, or gifting.
- Carbohydrate 368 g(123%)
- Cholesterol 279 mg(93%)
- Fat 14 g(22%)
- Fiber 22 g(89%)
- Protein 54 g(108%)
- Saturated Fat 3 g(17%)
- Sodium 2646 mg(110%)
- Calories 1806
Step-by-step
- PreparationMixing the yeast slurry
- In a large bowl, whisk together the yeast and 1 cup (125 grams/3.8 ounces) of the flour, then whisk in the warm water until smooth. Let the slurry stand uncovered for 10 to 20 minutes, or until it begins to ferment and puff up slightly.
- Mixing the dough
- Whisk the eggs, oil, salt, and sugar into the puffed yeast slurry until the eggs are well incorporated and the salt and sugar have dissolved. With your hands or a wooden spoon, stir in the remaining 4 cups (550 grams/20 ounces) flour all at once. When the mixture is a shaggy ball, scrape it out onto your work surface and knead it until it is smooth and firm, no more than 10 minutes. (Soak your mixing bowl in hot water now to clean it and warm it for fermenting the dough.) If the dough is too firm to knead easily, add a tablespoon or two of water to it; if it seems to wet, add a few tablespoons of flour.
- The dough should feel smooth, soft, and only slightly sticky.
- Fermenting the dough for the first time
- Place the dough in the warmed clean bowl and cover it with plastic wrap. Let ferment for 1 hour, or until just slightly puffed. While the dough is fermenting, prepare the apples.
- Preparing the apples
- Peel, quarter, and core the apples. Cut each quarter lengthwise in half, then cut each slice crosswise in half if the apple was medium size, or into three pieces if the apple was large; you should end up with large squarish chunks. Measure out 4 1/2 heaping cups (660 grams/23 ounces) of chunks (reserve any extra for another use) and transfer them to a covered container. (Braeburns do not brown excessively, but if you are using another variety and are concerned about overbrowning, toss the apples with a few drops of lemon juice.)
- Rolling out the dough and adding the apples
- Sprinkle the dough and your work surface with flour and pull the dough out of the bowl. Cut the dough into two equal pieces and keep one piece covered while you work on the other. Roll out the dough into a 16-inch (41-cm) square about 1/8 inch (3 mm) thick. Scatter 1 heaping cup of the apples over the center third of the dough, then fold up the bottom third to cover them. Press the dough into the apples to try to seal it around them. Scatter another heaping cup over the folded-over apple-filled portion of the dough and fold the top of the dough over it to create a very stuffed letter fold. Press down on the dough to try to push out any air pockets and to seal it around the apples. Roll the dough up from a short side into a chunky cylinder, push the dough into the bowl with the smooth side up, and cover it with plastic wrap. Repeat with the other piece of dough and put it in a second covered bowl or other container. Let the dough ferment for about another hour, or until slightly risen and very soft.
- Shaping and proofing the dough
- Oil two 8-inch (20-cm) round cake pans or 8 1/2-by-4 1/2-inch (18.5-by-8.5-cm) loaf pans. Using as much dusting flour as you need, pat each dough half as best as you can into a rough round or log shape, trying to keep the dough's smooth skin intact over the top. You will not be able to deflate the dough much at this point because of the apples. Slip the dough into the pans smooth side up and cover well with plastic wrap. (The shaped loaves can be refrigerated for up to 24 hours, which will only intensify their flavor.) Let the loaves proof until they have risen over the edges of their pans, about 30 minutes (or up to 1 1/2 hours if the loaves have been refrigerated).
- Immediately after shaping the breads (or 30 minutes before baking if the loaves have been refrigerated), arrange an oven rack in the lower third position, remove any racks above it, and preheat the oven to 350°F (180°C/gas mark 4).
- Baking the loaves
- When the loaves have risen and do not push back when gently pressed with your finger but remain indented, brush each one with a generous tablespoon of oil, then sprinkle them with a few tablespoons of sugar to form a sugary-oily crust. Bake for 45 to 55 minutes, until very well browned. After the first 40 minutes of baking, switch the pans from front to back so that the breads brown evenly. When the loaves are done, remove them from the oven, unmold them, and let them cool on a rack.
My Apple Challah Adventure: A Culinary Journey
Baking has always been my happy place, a sanctuary where I can lose myself in the rhythmic kneading of dough, the comforting aroma of rising bread, and the pure joy of creating something delicious from simple ingredients. This apple challah recipe, born from a desire for the most intensely appley bread imaginable, is a testament to that passion. I’ve always loved challah, its soft texture and subtle sweetness a perfect canvas for a variety of flavors. But the idea of infusing it with the bright, crisp taste of apples, creating a harmonious blend of textures and tastes, was particularly alluring.
My journey began with a simple goal: to create a challah so deeply infused with apple flavor that each bite was an explosion of juicy sweetness. I scoured countless recipes, drawing inspiration from various techniques and approaches. Early experiments involved incorporating finely diced apples, but this resulted in a slightly watery texture. Then came the epiphany: larger apple chunks. By using generously sized pieces, I could minimize the release of excess juice, while simultaneously enhancing the visual appeal and delivering bursts of concentrated apple flavor within each slice of bread.
The original recipe involved a lengthy and somewhat arduous hand-kneading process to fully incorporate the apples into the dough. However, a dedicated friend and fellow baking enthusiast, Rita, took on the challenge of refining the method. Her perseverance led to a breakthrough: rolling out the slightly fermented dough, layering the apples, and then folding the dough over them. This ingenious technique not only simplified the process, making it accessible to even the most novice baker, but also yielded an even more delightful final product.
The choice of apples played a significant role. After many tests with different varieties, I settled on Braeburn apples. Their readily available nature, combined with their uniquely spicy flavor, proved ideal. They held their shape beautifully throughout the baking process, maintaining their juicy texture without disintegrating into a mushy mess. However, feel free to experiment with your favorite baking apple—the final product will undoubtedly be delicious regardless of your chosen variety.
This apple challah isn't just a bread; it’s a sensory experience. The initial aroma, a captivating blend of sweet dough and tart apples, is enough to tantalize the taste buds. The texture, a delicate balance between the softness of the challah and the delightful crunch of the apple chunks, is a true masterpiece. And the flavor? Well, let’s just say it transcends the ordinary. It's a delightful symphony of sweetness and tartness, a comforting warmth balanced by refreshing acidity. Each bite is a journey, a delicious adventure from the soft, yielding crumb to the satisfying chew of the apple.
The versatility of this apple challah is another highlight. It makes a wonderful breakfast accompaniment, a delightful addition to an afternoon coffee break, or a stunning centerpiece for Rosh Hashanah celebrations. It is also an exceptionally thoughtful gift, a delectable treat that is sure to impress and delight any recipient. I've baked countless batches, sharing the joy with family, friends, and neighbors, each bite shared spreading warmth and happiness. It's more than just a recipe; it’s a tradition, a story, a piece of my heart baked into every golden, apple-studded loaf.
Beyond the recipe: Baking this apple challah is more than simply following instructions; it's about embracing the process, savoring the moments of creation, and sharing the joy of handmade goodness. The time spent kneading, folding, and proofing the dough is a meditation, a chance to unwind and connect with oneself. The anticipation of the first bite, the smell filling the kitchen, and the ultimate satisfaction of seeing the finished product—these are the moments that make baking an art form, a culinary meditation, a true passion.
So, gather your ingredients, preheat your oven, and prepare for a baking adventure. Let the warm aroma of this apple challah fill your home, creating an atmosphere of warmth and comfort. Bake it for yourself, share it with loved ones, and savor every delicious bite. It’s more than just bread—it’s a piece of home, a taste of happiness, and a truly unforgettable culinary experience.



